Sunday 31 March 2013

Challenge 76 Sunny Challenges and Creations

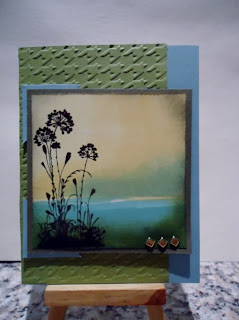
Hi there once again! This week over at Sunny Challenges and Creations, our very talented Kris supplied the sketch and the other part of the challenge was to use a background stamp or stamp a background. I used Night of Navy Card Stock, Very Vanilla Card Stock and Night of Navy and Sahara Sand ink. I decided I wanted to use the Open Sea set, and it came together ever so nicely I thought.
Firstly I used the ledger stamp from that set and using Sahara Sand I off stamped it onto some scrap then stamped it four times to cover the Very Vanilla cardstock I then took 3 smaller pieces of Very Vanilla and on one I stamped my main image and on the other two I ran them both through the Big Shot using the Hounds tooth Embossing Folder then matted them onto Night of Navy cardstock. I also stamped a compass and cut it out and attached it to the bottom panel. The middle Panel I used Teeny Tiny Sentiments and chose the happy birthday greeting.  I punched the greeting out using the Word Window Punch twice and slightly offset the Very Vanilla on the Night of Navy.The inside of the card I off stamped the Sahara Sand and placed the earth globe in it. We would love you to check the other creations and join us in this fun challenge! Till next time.....

Sunday 24 March 2013

Basic Masking

I made this card a few weeks ago for Sunny Challenges and Creations, which had a sketch and an Easter theme. I had a new stamper this week at class and so decided to show her the technique of Basic Masking and it also refreshed the other ladies on this technique as well. The colours we used were Whipser White Card Base, Lucky Limeade and Raspberry Ripple (sorry about the colour in the pic). We also used the Honeycomb Embossing folder. When the card was finished we just put touches to the main stamens of the flowers using Silver Sparkle Dazzling Detail liquid and the middle flower was raised on a dimensional. The greeting is from the set Well Scripted and was punched out using the Scallop Oval Punch. This is such a pretty card and when the ladies made their cards they used the sentiment of their choice from the Well Scripted stamp set. Till next time.......

Friday 22 March 2013

Window Sheet Card


Today I held a class and had one new lady join us, it was lovely to meet her and I think she had a great time, and was so happy with her creations being a very first time stamper. I decided that I would showcase  a couple of new items from the current catalogue and show the ladies how quick and easy this card was to make. We used the new Secret Garden Stamp set and also the matching Framelits that match all the stamps....it makes cutting out so much easier, a few turns of the handle of the Big Shot and you are in business! We also used the Finishing Touches Edgelits to give the lacy look to the cardstock. The DSP used was retired as was the stamp for the greeting that was stamped on the inside of the card on the right hand side so it was visible when the card front was closed. I had seen these cards before, and this time my inspiration came from Vicky a very good friend and a very talented papercrafter. Till next time......

Monday 18 March 2013

Direct Ink to Paper Technique


Direct to Paper Technique or DPT is a very simple but effective way to create a back ground in a matter of seconds! The thing to remember when you first attempt this technique is be 'lightly as you go' When you have done it a couple of times and feel a little more adventurous you may well want to see the effects that you can have by being a bit more heavy handed with the inks you are using. I followed a tutorial by Michelle Zhindorf changed the colours, the embossing folder used and added some brads to the bottom corner of the card. I am going to show the ladies that come to the class this week how to do this wonderfully simple technique. I used Marina Mist for my base, and the houndstooth embossing folder on the old olive card stock. The DITPT card front was mounted on Always Artichoke and the little corners were made by punching out a 1 3/8" square and cutting it diagonally in half and placing behind the Always Artichoke on the top and bottom corners on the non opening side of the card. On the inside of the card I  used the same image as the front using Sahara Sand but off stamped it three times before stamping of the Whisper White insert. This is so there is just a very faint image and therefore able to write over it if required. This is such a fun technique and I hope you will try it. Till next time

Sunday 17 March 2013

Get Well or Hope you feel better challenge


Hi Stampers this week I set the challenge at Sunny Challenges and Creations, the brief was very simple just create a Get Well Card scrap page of 3D item. Even though I set the challenge I still had to think about what I wanted to do. I took a piece of Marina Mist card stock, folded in half and then in half again on the front opening.  I then placed the beginning of the folded front half in the big shot and using the largest of the  Apothecary Accents Framelits cut out 1/2 the shape, I also cut a full framelit the same size but using Twitterpad DSP. I then embossed the card front using the Elegant Lines embossing folder twice to get embossed coverage to the whole of the card front, and then I folded the 'scrap piece' back to the centre of the card. I used white taffeta ribbon to the front and adhered it under the back flap of the front. I used the Word Play stamp set for my sentiment and punched it out with the Decorative Label Punch and sponged around the outer edge with Marina Mist. For the inside of the card I used the Tulips embossing folder on Whisper white card stock and added the flower image from Serene Silhouettes, which I had stamped off three times before adding it to the Whisper White. Kris, Vicky and I hope you will play along with us the next two weeks on Sunny Challenges and Creations, and check out what our guest designers have come up with for the challenges as well. Till next time....

Sunday 3 March 2013

Sunny Challenges 74/13

This week over at Sunny Challenges and Creations, it was Vicky's turn to present the challenge. Vicky gave us this sketch and it was to be an Easter card. First up my thoughts turned to the usual Easter Bunnies, chocolate eggs, adorable little chicks and so on. When I eventually banished these images from my mind I came up with this creation.
 My card base is Whisper White, and I have matted that with a strip of Raspberry Ripple that was embossed with the Honeycomb embossing folder that I ran through the Big Shot. I matted  piece of Whisper White onto another piece of Raspberry Ripple, and using the masking technique I stamped the large flower from Everything Eleanor and then stamped another flower image, cut it out and attached it to the centre flower with  dimensional. I off stamped the flourish using Gumball Green. The sentiment from Well Scripted stamp set is stamped in Raspberry Ripple and punched out using the Scallop Oval Punch. To finish it off I dabbed Silver Dazzling details on the stamens of each flower. We love to see your creations too and who knows you could be our next Ray of Sunshine, till next time...... 


Saturday 2 March 2013

Flower Treat Holder

The weather here in not so sunny Queensland is keeping many of us indoors, so today I thought that I would make some flower treat holders. I first saw some that Kris had made, following a tutorial at Stamp Academy . They have the most amazing tutorials there and the projects are so easy with step by step instructions both by video and PDF. I loosely based mine on those, instead of using Hearts a Flutter and the coordinating framelets, I used Fun Flowers Bigz L die and using the large and the smaller flower, I ran the DSP through the Big Shot. Some of the DSP is current and some is not. I was using up what I had on my work bench...so much better to use it up than have to put it away! I also used some non SU Jumbo type brads in the shape of a flower and some others that I either tied a bow on or threaded ribbon through the eyelets of them. I basically followed the instructions supplied. I filled the cello bags with M & M's and Smarties. I know the grandies will love these. Till next time...